Wednesday 26 July 2017

Planning and Evolving a Homespun Marled Magic WestKnit

Stephen West is a knitting god.

Ok, that goes without saying. And over the past few years, I've knit a few of them. And dream knit a few more.


That Exploration Station on the right is one I am particularly proud of. I hand spun that bad boy. And sure I dyed the yarn in shades that more resemble hubba bubba bubble gum than anything else, but I still love it in all it's squishy goodness.

That's why when Stephen announced his spring mystery knit along, I knew I wanted to spin for this project. (Plus I had literally just finished my Building Blocks shawl, and I didn't have the time or stamina to keep up with a mystery knit. Planning to spin for it gave me a good excuse to wait until after).

When I found out it was going to be a marled project, I had a good idea of what I wanted to do.


The concept was clear, I would spin singles, hold them double while I knit and let them do the colour changing magic for me! And right away I had an idea of what kind of fibre I wanted to spin.

These are Odd Balls, by Stitch Together Studio.

Although when I bought two bags of them, they were called scatter bits. And they are fabulous little 1-2g balls of merino pencil roving in hand dyed goodness.


I dyed up some merino roving that I had in my stash in a solid black and thought I would be set..... more or less.


And rather than spin them randomly, I separated them out according to colour. You can see more of my thought process for this project in this Tour de Fleece video.

But when I was at Olds Fibre Week, I got it in my head I would need at least one more braid to combine into this project. And picked up one by Flock Fibre Studios in their Princess Tiger Cub colourway.


Here it is marled with the black on the first section of the shawl. It was at this point I decided I needed more. Luckily I was headed into the Stash reopening this past weekend, and while I was there I found the perfect Tin Roof Fibre Studio braid, and settled on my final palette.


While I spun up all of my minis, I decided to only work with the Purple through Yellow section of the colour wheel they made up.


And yesterday, as soon as all my minis were weighed and measured, I dove into section 2 of the shawl.


Sooo pink and fantastical! Tomorrow I'll share the maths I'm using to marl this section and maximally utilize my minis. This is the Yarn Lab after all, and how could I resist some knitting maths?

Oh and as for the rest of the minis from this colour wheel? I have an idea for them already!


Colour pops in a Squiggle Wiggle What?! but that's a homespun westknit project for a future date!

Saturday 22 July 2017

A FO, from start to finish: the Girl from the Grocery Store Shawl

I watch a lot of knitting podcasts on YouTube. So this year when the Grocery Girls teamed up with Joji Locatelli and the Girl from the Grocery Store shawl was born, I drank the kool aid and planned to knit one.


Now I have a lot of shawls for myself, so I also thought maybe I better cast this one on for someone else. I won't say who, only that they will be getting it for Christmas this year (and yes it is never too early to start on Christmas knitting).

I also wanted to dye the yarn for it myself.


I dyed up three skeins of yarn on Knit Picks Gloss Fingering (a beautiful 70% Merino, 30% silk yarn) and took them to Instagram for opinions on which to pick. The gold and the wine colour won out the day.


Alex and Dom agreed. Oh and notice how little they are in this pick, heck they still had their NG tubes when I cast this shawl on back in January!

This was a long term WIP, I knit most of it in the car, since it is a predominantly garter stitch shawl, with a consistent pattern, it makes for perfect car knitting.


But this month, I knew the end was in sight and that I'd better just get on with it. So I knit monogamously for two days and finished it off.


Dom even offered to model it for me, how can anyone resist those lips?


So here's my finished Girl from the Grocery Store shawl.


Not my favourite knit (all the garter gets boring once the rows get longer), and maybe not my personal style, but a beautiful FO. And I know the recipient will love it!

Saturday 15 July 2017

My Patons Kroy Socks: Free Pattern

I love me some Patons Kroy. In the days before discovering my LYS, and the beautiful sock yarns to be had there, I flocked to Micheals for all of my yarny needs, and over the years I've grown quite the stash of Patons Kroy self paterning sock yarn.


However, having only found my way to sock knitting in the past few years, I put my Patons to some other, more interesting uses.


Prototypes for a cute self paterning yarn sweater... the neckline still needs working out also kroy is just way too scratchy for baby sweaters. Soooo maybe I'll come back to this one day.

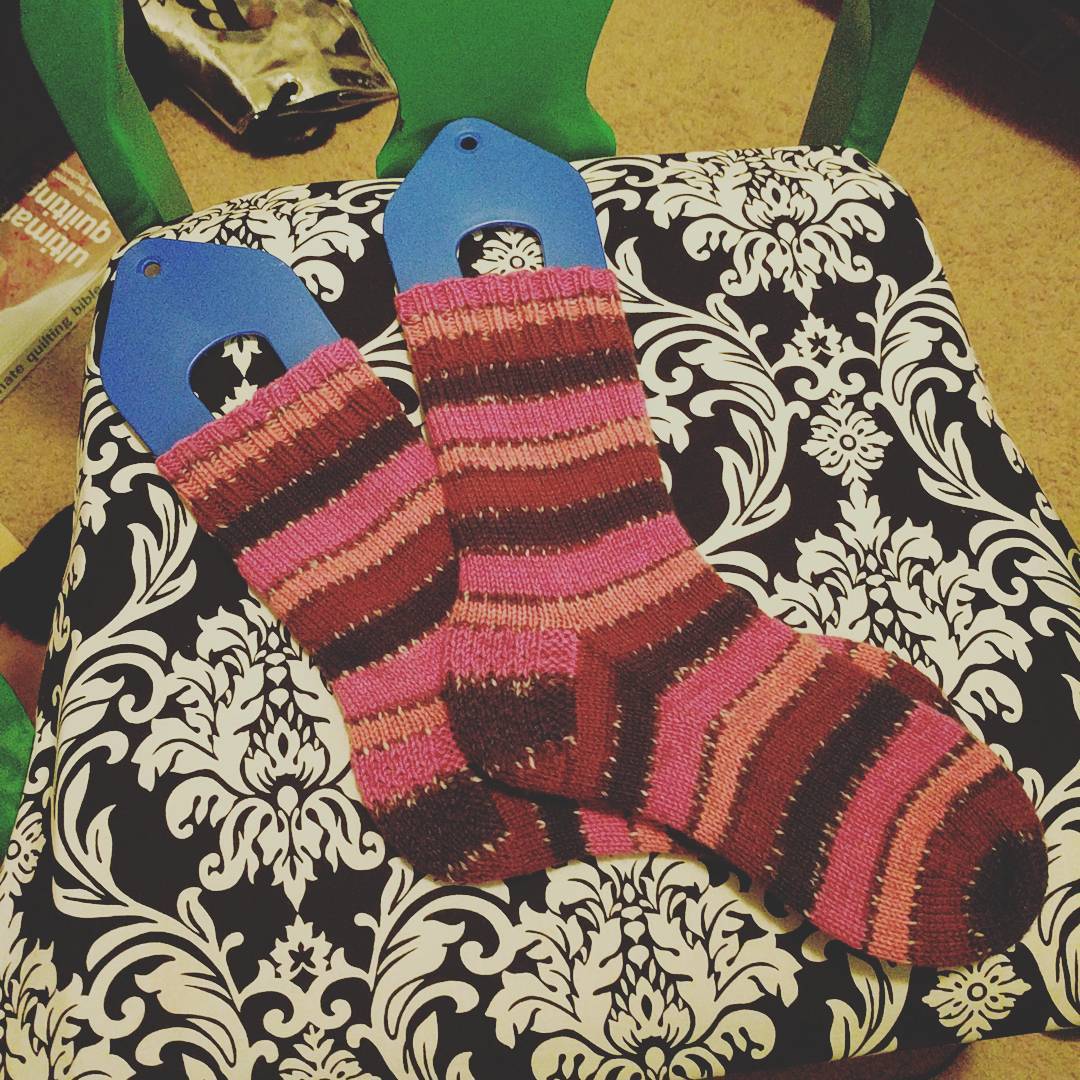
Anyways, lately I love me a pair of Kroy Socks. Since the yarn, which is 75% superwash wool, 25% nylon, is a heavier fingering weight (bordering on sport weight), you should go up a needle size (we've all heard stories of kroy socks knit on US 1s that can stand up on their own. and some people have even knit them themselves). And going up a needle size with socks means coming down in stitch count.


I normall knit a 60 or 64 stitch sock, with fingering weight yarn on US 1 (2.25mm) needles. My Kroy socks I knit with 54 stitches on US 2 (2.75mm) needles. And you know what, besides the fact that self striping yarn knits faster, fewer stitches on bigger needles also makes one hell of a difference.

So below you'll find the pattern/recipe that I use for Kroy socks, it'll always be available here for free. But I also plan on writing up a sock pattern for top down heel flap and gusset socks, properly, and with photos to show exactly what I mean by picking up my stitches and such. That should be available for purchase (probably $2) on Ravelry in the next few weeks.

So here's how I knit my Kroy socks.

Materials

2 50g balls of Patons Kroy
US 2 (2.75mm) needles I use 9 inch circs for the cuffs and DPNs from the heel down
Darning needle and scissors for weaving in ends

Cast on 56 (or your desired #, remember, bigger needles=fewer stitches) stitches using a long tail cast on. Choose a colour change point for the first loop in your cast on if you want matchy matchy socks.

Knit in 2 by two ribbing for 2 inches or so, ending at a colour change point.

Knit even for desired leg length, depending on the length of the striping pattern, I like one or two repeats.

Heel Flap

To avoid disrupting the striping pattern on the front of the sock, join yarn from other end of ball (or in the first example, I used only the white with black specs sections... this meant for lots of weaving in of ends.

Working over back half of stitches only

Row 1- Purl 2, (knit 1, Slip 1 with yarn in back) repeat until 2 stitches before end of row, knit 2
Row 2- Knit 2, purl to end of row
Row 3- Purl 2, (slip 1 with yarn in back, knit 1) repeat until 2 stitches before end of row, knit 2
Row 4- Knit 2, purl to end of row

Repeat these 4 rows until you have knit the same number of rows as stitches on your needle - ie) I have 56 stitches total, I am working on the back 28, so I need to knit my heel flap 28 rows long. Since this flap has garter ridges on each side, I just knit until I have 14 garter ridges (half of 28).

On the last purl row.... do not purl to end of needle, proceed to heel turn.

Heel Turn

Starting with last row of heel flap
Row 1-  knit 2, purl to 1 stitch past center point (ie I have 28 stitches, I purl to the 15 stitch), purl 2 together, purl 1, turn.
Row 2- Slip first stitch, knit 3, knit 2 together, knit 1, turn.
Row 3- Slip first stitch, purl to 1 stitch before turn, purl 2 together, purl 1, turn.
Row 4- Slip first stich, knit to 1 stitch before tutn, knit 2 together, knit 1, turn.

Repeat rows 3 and 4 until all stitches have been worked. break yarn.

Heel Gusset

Now, we're going to continue with the main yarn, still attched, starting in the corner between the leg and the heel flap. I find it best to work with DPNs here, my sock at this point would have all of the front stitches still on my 9 inch circ, and my heel flap/turn on a single DPN.

Set Up:

Using a free DPN, pick up two loops in the corner, then pick up one stitch in each garter ridge along right side of heel flap. (note this is just picking up, not knitting).

With a free DPN and yarn from leg of sock, knit the two picked up loops together as one, knit each of the picked up stitches and knit half of the stitches from the heel turn.

With a free DPN, pick up one stitch in each garter ridge along the left side of the heel flap, pick up two loops in the corner between the heel flap and leg.

With a free DPN, continue knitting across the back of the heel, then knit into each of the picked up stitches, working the last two loops together as one.

With a free DPN, knit half of the front stitches.

With a free DPN, knit the remaining front stitches.

You should now have your sock on 4 DPNs: needle 1 - right gusset and first half of back; needle 2 - second half of back and left gusset; needle 3 - first half of front; and needle 4 - second half of front.

Decreases:

Round 1- back stitches: knit 2 together, knit to 2 before end, slip slip knit, front stitches - knit even
Round 2 - knit even
Round 3 - back stitches - Knit 1, slip slip knit, knit to 3 before end, knit 2 together, knit 1, front stitches - knit even
Round 4 - knit even

Repeat rounds 3 and 4 until you have the same number of stitches on all your needles (total cast on stich count, divided by 4).

Knit even until you are ready for toe decreases.

Toe

Depending on the striping pattern, I either continue with my working yarn, or switch to a contrasting yarn.

Round 1: back stitches - knit 1, slip slip knit, knit to 3 before end, knit 2 together, knit 1, repeat on front stitches
Round 2: knit even

Repeat rounds 1 and 2 until 40 stitches remain.

Repeat round 1 until 16 stitches remain.

Break yarn and kitchener stitch toe closed.

Repeat for second sock (and if your like me, match all of your stripes perfectly!)

Wednesday 12 July 2017

Tour de Fleecing

Hey there Fibre Friends! I'm at it again.

Two years ago, in the spring of new love with my Ashford Kiwi spinning wheel, I embarked on the Tour de Fleece (and video blogged my way through it).

You can watch those videos on my YouTube Channel right here.


Then last year the tour came and passed, and I managed a measely two daysz of it.

But who can blame me, I was busy with something else.


Aren't they adorable little peanuts. So sweet and sleepy, unlike today when they decided that getting into all the kitchen drawers was way more important than napping.

Any how, this year I am in fact determined. And again making videos!


There are the first two, go on and watch them!

I even got my old drop spindle out and finished off a project that has been hibernating on it since 2015!

Today I emptied off my first set of bobbins and washed up some yarns. And I am eager for those pesky peanuts (jk I adore my busy little boys] to get off to sleep so mommy can spin some more!


Are you spinning in the tour this year? Let me know!

Sunday 2 July 2017

Soaking up my dyes

Happy Canada Day everyone! I hope you all had an amazing one, whether you are Canadian or not. We spent ours as a family (with Granda and Grandpa in town). We enjoyed the sunny weather, took the boys to the Parade over in Coleman, AB (a pleasant surprize). And unfortunately, spent most of the rest of the day packing house. We're on the move again today. Goodbye beautiful Crowsnest Pass mountains! We'll miss you. Hello Strathmore (which I am trying to be excited about.... at the very least we're super close to Calgary).


It'll be a while before I can take pictures of yarn with backdrops this beautiful again!

Anyways, to get ready for packing up this week, I decided I wanted to use up all of my liquid dyes. The condiment squeeze bottles they were in were cheaper than expected, and also (probably related) leakier. So I figured it was best to just go ahead and use the dye.

Plus Tour De Fleece is underway, so who doesn't need more beautiful dyed fibre? right?


The dyes I had to work with were all from Jacquard. You can't see the turquoise or the Aztec gold in the picture, they are the two in the back. Oh and that fire red. Either it didn't want to set at the same conditions as the rest, or it just wants to bleed like a mo fo (probably both).


The fibre was two 120g lengths of superwash treated 100% Merino Lambswool, that I pick up from Shuttleworks before they closed last year. I've dyed this fibre before and it takes up dye beautifully. It also just wants to fall apart. The fibre wants to stick to your hands (or anything else for that matter) every time you handle it and the braids come out of the process a little worse for wear looking. Fine for hoe use, not likely something I'd sell. So maybe I'd better sharpen up my dyeing process for roving.

Annnyways. The first braid I dyed in a roasting pan in the oven. Soaked it in water and vinegar first (for maybe 10 min only) and then let some of the water drain out before aranging it in the pan for dyeing.


Fire red at one end, then black, violet, less violet, and sun yellow. splattered all over with more red.

The second braind I dyded in the pot. I losely braided the firbre before soaking, and left it braided so some sections would be less accessable to the dye (a great idea when you're being heavy handed with dye).


Terrible picture I know. but literally all I did was apply everything that was left of each dye, each in it's own spot, evenly distributed around the pot.

Oh and I tried something else new this time. I spun the water out of my braids in the washer before hanging them to dry, and I must say I'm a convert! would have tried it sooner, but when I was doing a tonne of dyeing back in 2015, I only had access to coin opperated laundry.


Here are the braids. The one on the left came out of the pot and the one on the right came out of the pan. You can see how the fire red bled into all of the white spots, but the braids still came out pretty.


And here they are outside, trying to show the colours more truly.

You can also see these braids on the Day 01 video of my 2017 Tour De Fleece, on YouTube now. Plus all the other fibre I'll be spinning this month, and a section on carding and spinning Shetland Fleece for a Lopi style yarn.

Happy spinning!